There are four ways to select a project when managing expense entries. You can use the expandable Project Tree, the Inline Tree in the Project select list, Project Search, or the My Projects List.
Project Tree
The first method allows you to select a project from a hierarchical tree that contains all the projects to which you have been granted access, as well as some of the parent projects that are required for drilling down into the hierarchy. To view the tree, click the Project Tree Icon ( ), an arrow with a list, located to the left of the respective Project select list. This will launch a pop-up window containing a navigable project tree with expanding and collapsing nodes (see figure 30.2). To open a node and view all tasks/child projects, click the expand node. To close a node and hide all tasks/child projects, click the collapse node. When you have found the project that you wish to log time to, select the project and click the Done button. This will close the pop-up window and the project you selected should appear in the Project select list.

Figure 30.2. Project tree
Inline Tree in Select List
The second method allows you to drill down into the project hierarchy using a project tree that is included in the project select list itself. If your administrator has set up your entry screen to include this option, you can navigate down through the hierarchy of projects by clicking on selections directly in the Project select list. After each selection, the next level in the hierarchy is displayed. The final selection that is made prior to save determines the project to which an entry will be logged.
Project Search
The third method allows you to specify search criteria and select a project from the search results. To do a project search, click the Project Search Icon ( ),the magnifying glass, located to the left of the respective Project select list. This will launch a pop-up window containing search criteria (see figure 30.3). Specify the project name or description of the project to be located. As you type, you will see returned search results below the search criteria. From the search results, you can select the project for use in a new entry. When you select the project, the pop-up window will automatically close and the project you selected will appear in the Project select list. Additional search options are available by clicking on the arrow to expand the Search Options table.
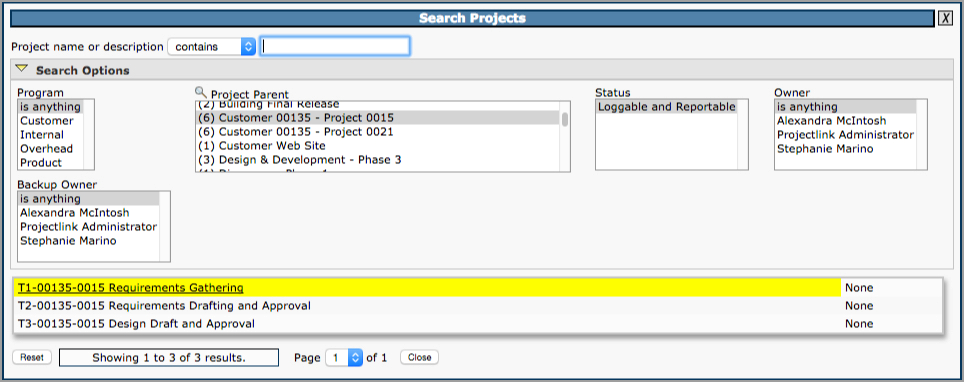
Figure 30.3. Project search
You can maintain your own unique list of projects that will be displayed by default in the project select list. This will keep you from having to routinely locate and select a project using the other methods when you have a group of projects that you routinely work. The My Projects link, a number in parentheses next to the Project column label, will launch a pop-up window that can be used to add and remove projects from your unique Project list (see figure 30.4). You may add projects from the Available Projects list by selecting the projects and clicking the Add button. These projects will be added to your project list shown in the box to the right. To remove a project from your project list, select the projects and click the Remove button. You also have the ability to add and remove all projects to and from your Project List. When you are finished, click the Save button.

Figure 30.4. My Projects